GimpのPythonコンソールを使って、画像中で指定した色のピクセル数を出力するスクリプトの例
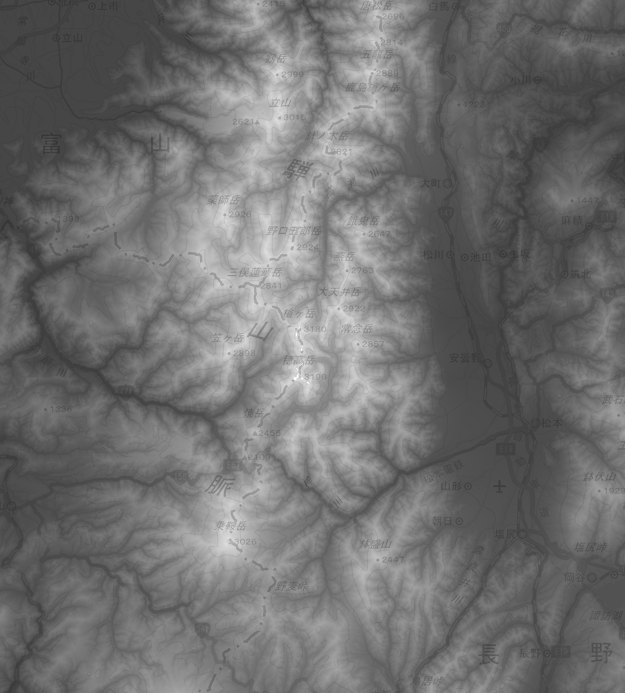
サンプルとして利用するのは、国土地理院の色別標高図(カラーマップ)。
指定した色より薄い色のピクセル数を求める
def colormap_calc_bright_dark():
    # 解析対象の画像、レイヤー
    image = gimp.image_list()[0]
    layer = image.active_layer
    # カウンター
    count_bright = 0
    count_dark = 0
    count_transparent = 0
    # Gimpツールの前景色を基準色とし、輝度Yを算出
    col_fg = (gimp.get_foreground()[0], gimp.get_foreground()[1], gimp.get_foreground()[2])
    y_fg = 0.299 * col_fg[0] + 0.578 * col_fg[1] + 0.114 * col_fg[2]
    col = layer.get_pixel(0, 0)
    # アルファチャンネルが存在するかどうか判定
    alpha_exist = 0
    if len(col) >= 4:
        alpha_exist = 1
    # 画像の全ピクセルを順次スキャンする
    for w in range(0, layer.width):
        for h in range(0, layer.height):
            # 指定したピクセルの色を読み出し、輝度Yを計算
            col = layer.get_pixel(w, h)
            y = 0.299 * col[0] + 0.578 * col[1] + 0.114 * col[2]
            # 条件に沿ったカウンターのインクリメント処理
            if alpha_exist == 1 and col[3] == 0:
                count_transparent += 1
            elif y >= y_fg:
                count_bright += 1
            else:
                count_dark += 1
    # 結果表示
    print("pick color= {}R {}G {}B, Y={}".format(col_fg[0], col_fg[1], col_fg[2], y) )
    print("bright= {} px, dark= {} px transparent= {} / all= {} px".format(count_bright, count_dark, count_transparent, (layer.width * layer.height)) )
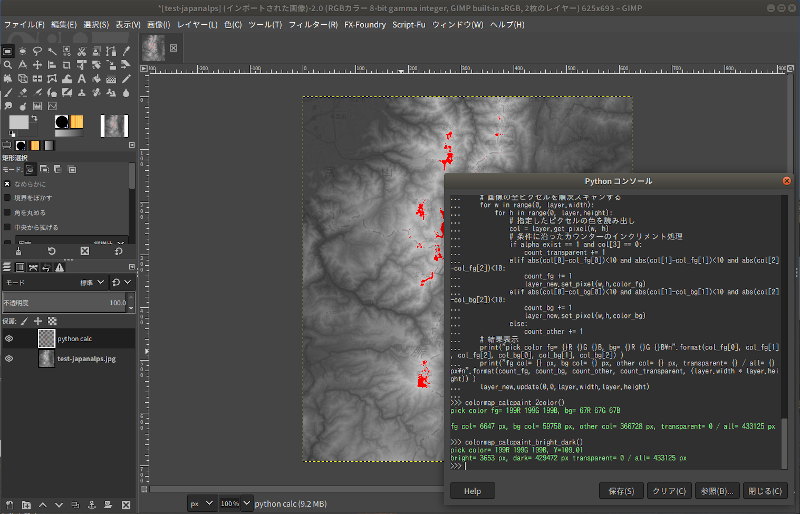
上記の関数を実行すれば、前景色に指定した色より薄い色のピクセル数を求めてくれる
Gimp Pythonコンソールでの実行状況
>>> colormap_calc_bright_dark()
pick color= 199R 199G 199B, Y=109.01
bright= 3653 px, dark= 429472 px transparent= 0 / all= 433125 px
指定した色より薄い色のピクセル数を求める(対象となったピクセルを別レイヤーで着色する)
def colormap_calcpaint_bright_dark():
    # 解析対象の画像、レイヤー
    image = gimp.image_list()[0]
    layer = image.active_layer
    # count_bright に含めたピクセルを着色する新規レイヤーと着色する色
    layer_new = image.new_layer("python calc",pos=1)
    color_new = [255,0,0,255]
    # カウンター
    count_bright = 0
    count_dark = 0
    count_transparent = 0
    # Gimpツールの前景色を基準色とし、輝度Yを算出
    col_fg = (gimp.get_foreground()[0], gimp.get_foreground()[1], gimp.get_foreground()[2])
    y_fg = 0.299 * col_fg[0] + 0.578 * col_fg[1] + 0.114 * col_fg[2]
    # アルファチャンネルが存在するかどうか判定
    col = layer.get_pixel(0, 0)
    alpha_exist = 0
    if len(col) >= 4:
        alpha_exist = 1
    # 画像の全ピクセルを順次スキャンする
    for w in range(0, layer.width):
        for h in range(0, layer.height):
            # 指定したピクセルの色を読み出し、輝度Yを計算
            col = layer.get_pixel(w, h)
            y = 0.299 * col[0] + 0.578 * col[1] + 0.114 * col[2]
            # 条件に沿ったカウンターのインクリメント処理
            if alpha_exist == 1 and col[3] == 0:
                count_transparent += 1
            elif y >= y_fg:
                count_bright += 1
                layer_new.set_pixel(w,h,color_new)
            else:
                count_dark += 1
    # 結果表示
    print("pick color= {}R {}G {}B, Y={}".format(col_fg[0], col_fg[1], col_fg[2], y) )
    print("bright= {} px, dark= {} px transparent= {} / all= {} px".format(count_bright, count_dark, count_transparent, (layer.width * layer.height)) )
    # レイヤーに書き込んだ内容を表示する
    layer_new.update(0,0,layer.width,layer.height)
前景色・背景色に指定した色の領域のピクセル数を求める
指定した色に対して、RGBそれぞれ10/255以内であれば「一致」とする。
def colormap_calc_2color():
    # 解析対象の画像、レイヤー
    image = gimp.image_list()[0]
    layer = image.active_layer
    # カウンター
    count_fg = 0
    count_bg = 0
    count_other = 0
    count_transparent = 0
    # Gimpツールの前景色・背景色を基準色とする
    col_fg = (gimp.get_foreground()[0], gimp.get_foreground()[1], gimp.get_foreground()[2])
    col_bg = (gimp.get_background()[0], gimp.get_background()[1], gimp.get_background()[2])
    col = layer.get_pixel(0, 0)
    # アルファチャンネルが存在するかどうか判定
    alpha_exist = 0
    if len(col) >= 4:
        alpha_exist = 1
    # 画像の全ピクセルを順次スキャンする
    for w in range(0, layer.width):
        for h in range(0, layer.height):
            # 指定したピクセルの色を読み出し
            col = layer.get_pixel(w, h)
            # 条件に沿ったカウンターのインクリメント処理
            if alpha_exist == 1 and col[3] == 0:
                count_transparent += 1
            elif abs(col[0]-col_fg[0])<10 and abs(col[1]-col_fg[1])<10 and abs(col[2]-col_fg[2])<10:
                count_fg += 1
            elif abs(col[0]-col_bg[0])<10 and abs(col[1]-col_bg[1])<10 and abs(col[2]-col_bg[2])<10:
                count_bg += 1
            else:
                count_other += 1
    # 結果表示
    print("pick color fg= {}R {}G {}B, bg= {}R {}G {}B".format(col_fg[0], col_fg[1], col_fg[2], col_bg[0], col_bg[1], col_bg[2]) )
    print("fg col= {} px, bg col= {} px, other col= {} px, transparent= {} / all= {} px".format(count_fg, count_bg, count_other, count_transparent, (layer.width * layer.height)) )
前景色・背景色に指定した色の領域のピクセル数を求める(対象となったピクセルを別レイヤーで着色する)
def colormap_calcpaint_2color():
    # 解析対象の画像、レイヤー
    image = gimp.image_list()[0]
    layer = image.active_layer
    # count_fg,count_bg に含めたピクセルを着色する新規レイヤーと着色する色
    layer_new = image.new_layer("python calc",pos=1)
    color_fg = [255,0,0,255]
    color_bg = [0,255,0,255]
    # カウンター
    count_fg = 0
    count_bg = 0
    count_other = 0
    count_transparent = 0
    # Gimpツールの前景色・背景色を基準色とする
    col_fg = (gimp.get_foreground()[0], gimp.get_foreground()[1], gimp.get_foreground()[2])
    col_bg = (gimp.get_background()[0], gimp.get_background()[1], gimp.get_background()[2])
    col = layer.get_pixel(0, 0)
    # アルファチャンネルが存在するかどうか判定
    alpha_exist = 0
    if len(col) >= 4:
        alpha_exist = 1
    # 画像の全ピクセルを順次スキャンする
    for w in range(0, layer.width):
        for h in range(0, layer.height):
            # 指定したピクセルの色を読み出し
            col = layer.get_pixel(w, h)
            # 条件に沿ったカウンターのインクリメント処理
            if alpha_exist == 1 and col[3] == 0:
                count_transparent += 1
            elif abs(col[0]-col_fg[0])<10 and abs(col[1]-col_fg[1])<10 and abs(col[2]-col_fg[2])<10:
                count_fg += 1
                layer_new.set_pixel(w,h,color_fg)
            elif abs(col[0]-col_bg[0])<10 and abs(col[1]-col_bg[1])<10 and abs(col[2]-col_bg[2])<10:
                count_bg += 1
                layer_new.set_pixel(w,h,color_bg)
            else:
                count_other += 1
    # 結果表示
    print("pick color fg= {}R {}G {}B, bg= {}R {}G {}B\n".format(col_fg[0], col_fg[1], col_fg[2], col_bg[0], col_bg[1], col_bg[2]) )
    print("fg col= {} px, bg col= {} px, other col= {} px, transparent= {} / all= {} px\n".format(count_fg, count_bg, count_other, count_transparent, (layer.width * layer.height)) )
    # レイヤーに書き込んだ内容を表示する
    layer_new.update(0,0,layer.width,layer.height)
結果をダイアログボックスで表示したい場合は...
import gtk
def colormap_calcpaint_2color():
    # 解析対象の画像、レイヤー
    image = gimp.image_list()[0]
    layer = image.active_layer
 〜 中略 〜
            else:
                count_other += 1
    # レイヤーに書き込んだ内容を表示する
    layer_new.update(0,0,layer.width,layer.height)
    # 結果表示
    msgbox = gtk.MessageDialog(buttons=gtk.BUTTONS_OK)
    msgbox.set_title("結果表示")
    str_result = "pick color fg= {}R {}G {}B, bg= {}R {}G {}B\n\n".format(col_fg[0], col_fg[1], col_fg[2], col_bg[0], col_bg[1], col_bg[2])
    str_result += "fg col= {} px, bg col= {} px, other col= {} px, transparent= {} / all= {} px\n".format(count_fg, count_bg, count_other, count_transparent, (layer.width * layer.height))
    msgbox.set_markup(str_result)
    msgbox.run()
    msgbox.destroy()

