代表的なSWTヴィジェットの使い方メモ
それぞれのクラスの言語ヘルプは、こちらのEclipse言語リファレンスに掲載されている。
テキスト (text)

コードのサンプル。レイアウト右下のボタンを押すと、テキスト領域に入力されたテキストの内容をメッセジボックスに表示するサンプル例。
public static void main(String[] args) {
    Display display = new Display();
    Shell shell = new Shell(display, SWT.SHELL_TRIM);
    // レイアウト全体の基本設計
    this.setSize(400, 100);
    this.setText("ヴィジェットのテスト");
    GridLayout layout = new GridLayout(3, false);   // 横3カラムのグリッド
    shell.setLayout(layout);
    // レイアウトに配置する要素(ヴィジェット)
    Label label = new Label(shell, SWT.NONE);
    label.setText("Text");
    Text t = new Text(shell, SWT.BORDER);
    t.setText("テスト文字列");
    t.setLayoutData(new GridData(GridData.FILL_HORIZONTAL));
    // レイアウト下部に表示するボタン
    Button button = new Button(shell, SWT.NULL);
    button.setText("値の表示");
    GridData gridData = new GridData(GridData.HORIZONTAL_ALIGN_END);
    gridData.horizontalSpan = 3;        // 3セルを結合
    button.setLayoutData(gridData);     // ヴィジェットを右寄せ表示
    button.addSelectionListener(new SelectionListener() {
        @Override
        public void widgetSelected(SelectionEvent e) {
            MessageBox msgbox = new MessageBox(shell,SWT.OK);
            msgbox.setMessage(String.format("text = %s", t.getText()));
            msgbox.open();
        }
        @Override
        public void widgetDefaultSelected(SelectionEvent e) {
        }
    });
    shell.open();
    while (!shell.isDisposed()) {
        if (!display.readAndDispatch()) {
            display.sleep();
        }
    }
    display.dispose();
}
スライダー (Slider)

public static void main(String[] args) {
    Display display = new Display();
    Shell shell = new Shell(display, SWT.SHELL_TRIM);
    // レイアウト全体の基本設計
    this.setSize(400, 100);
    this.setText("ヴィジェットのテスト");
    GridLayout layout = new GridLayout(3, false);   // 横3カラムのグリッド
    shell.setLayout(layout);
    // レイアウトに配置する要素(ヴィジェット)
    Label label = new Label(shell, SWT.NONE);
    label.setText("Slider");
    Slider slider = new Slider(shell, SWT.NONE);
    slider.setMinimum(0);
    slider.setMaximum(100);
    slider.setIncrement(1);
    slider.setSelection(30);
    slider.setLayoutData(new GridData(GridData.FILL_HORIZONTAL));
    Text t = new Text(shell, SWT.READ_ONLY);
    t.setText("30");
    // スライダーを操作に反応
    slider.addSelectionListener(new SelectionListener() {
        @Override
        public void widgetSelected(SelectionEvent e) {
            t.setText(String.format("%d", slider.getSelection()));
        }
        @Override
        public void widgetDefaultSelected(SelectionEvent e) {
        }
    });
    // レイアウト下部に表示するボタン
    Button button = new Button(shell, SWT.NULL);
    button.setText("値の表示");
    GridData gridData = new GridData(GridData.HORIZONTAL_ALIGN_END);
    gridData.horizontalSpan = 3;        // 3セルを結合
    button.setLayoutData(gridData);     // ヴィジェットを右寄せ表示
    button.addSelectionListener(new SelectionListener() {
        @Override
        public void widgetSelected(SelectionEvent e) {
            MessageBox msgbox = new MessageBox(shell,SWT.OK);
            msgbox.setMessage(String.format("slider = %d", slider.getSelection()));
            msgbox.open();
        }
        @Override
        public void widgetDefaultSelected(SelectionEvent e) {
        }
    });
    shell.open();
    while (!shell.isDisposed()) {
        if (!display.readAndDispatch()) {
            display.sleep();
        }
    }
    display.dispose();
}
スケール (Scale)

ソースコードは、上述の「スライダー」とほぼ同じのため、主な際の部分のみ示す。
    // レイアウトに配置する要素(ヴィジェット)
    Label label = new Label(shell, SWT.NONE);
    label.setText("Scale");
    Scale scale = new Scale(shell,SWT.HORIZONTAL);
    scale.setMinimum(0);
    scale.setMaximum(100);
    scale.setIncrement(10);
    scale.setSelection(30);
    scale.setLayoutData(new GridData(GridData.FILL_HORIZONTAL));
    Text t = new Text(shell, SWT.READ_ONLY);
    t.setText("30");
    // スケールの操作に反応
    scale.addSelectionListener(new SelectionListener() {
        @Override
        public void widgetSelected(SelectionEvent e) {
            t.setText(String.format("%d", scale.getSelection()));
        }
        @Override
        public void widgetDefaultSelected(SelectionEvent e) {
        }
    });
スピナー (Spinner)

    // レイアウトに配置する要素(ヴィジェット)
    Label label = new Label(shell, SWT.NONE);
    label.setText("Spinner");
    Spinner spinner = new Spinner(shell, SWT.NONE);
    spinner.setMinimum(0);
    spinner.setMaximum(100);
    spinner.setSelection(30);
    label = new Label(shell, SWT.NONE);     // 余白領域を最大幅で表示
    label.setLayoutData(new GridData(GridData.FILL_HORIZONTAL));
コンボボックス (Combo)

        // レイアウトに配置する要素(ヴィジェット)
    Label label = new Label(shell, SWT.NONE);
    label.setText("Combo");
    Combo combo = new Combo(shell,SWT.DROP_DOWN);   // SWT.READ_ONLY で編集不可
    for(int i=0; i<10; i++){ combo.add(String.format("項目 %02d", i+1)); }
    combo.select(2);
    label = new Label(shell, SWT.NONE);     // 余白領域を最大幅で表示
    label.setLayoutData(new GridData(GridData.FILL_HORIZONTAL));
  〜 中略 〜
    button.addSelectionListener(new SelectionListener() {
        @Override
        public void widgetSelected(SelectionEvent e) {
            MessageBox msgbox = new MessageBox(shell,SWT.OK);
            msgbox.setMessage(String.format("combo = %d", combo.getSelectionIndex()));
            msgbox.open();
        }
        @Override
        public void widgetDefaultSelected(SelectionEvent e) {
        }
    });
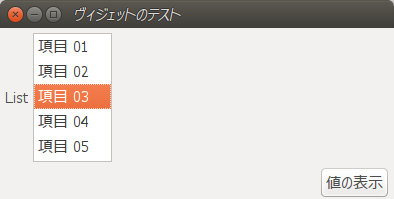
リストボックス (List)

    Label label = new Label(shell, SWT.NONE);
    label.setText("List");
    List list = new List(shell,SWT.SINGLE|SWT.BORDER|SWT.V_SCROLL);
    for(int i=0; i<5; i++){ list.add(String.format("項目 %02d", i+1)); }
    list.select(2);
    label = new Label(shell, SWT.NONE);     // 余白領域を最大幅で表示
    label.setLayoutData(new GridData(GridData.FILL_HORIZONTAL));
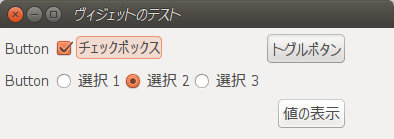
チェックボックス、トグルボタン、ラジオボタン (Button)

ublic static void main(String[] args) {
    Display display = new Display();
    Shell shell = new Shell(display, SWT.SHELL_TRIM);
    // レイアウト全体の基本設計
    this.setSize(400, 140);
    this.setText("ヴィジェットのテスト");
    GridLayout layout = new GridLayout(3, false);
    shell.setLayout(layout);
    // レイアウトに配置する要素(ヴィジェット)
    Label label = new Label(shell, SWT.NONE);
    label.setText("Button");
    Button buttonCheck = new Button(shell, SWT.CHECK);
    buttonCheck.setSelection(true);
    buttonCheck.setText("チェックボックス");
    Button buttonToggle = new Button(shell, SWT.TOGGLE);
    buttonToggle.setSelection(true);
    buttonToggle.setText("トグルボタン");

    label = new Label(shell, SWT.NONE);
    label.setText("Button");
    Composite composite = new Composite(shell, SWT.NONE);
    composite.setLayout(new FillLayout(SWT.HORIZONTAL));
    Button buttonR1 = new Button(composite, SWT.RADIO);
    buttonR1.setText("選択 1");
    Button buttonR2 = new Button(composite, SWT.RADIO);
    buttonR2.setText("選択 2");
    buttonR2.setSelection(true);
    Button buttonR3 = new Button(composite, SWT.RADIO);
    buttonR3.setText("選択 3");
    // レイアウト下部に表示するボタン
    Button button = new Button(shell, SWT.NULL);
    button.setText("値の表示");
    GridData gridData = new GridData(GridData.HORIZONTAL_ALIGN_END);
    gridData.horizontalSpan = 3;        // 3セルを結合
    button.setLayoutData(gridData);     // ヴィジェットを右寄せ表示
    button.addSelectionListener(new SelectionListener() {
        @Override
        public void widgetSelected(SelectionEvent e) {
            // ラジオボタンの選択項目番号を得る
            int radioSelectedId = 0;
            if(buttonR1.getSelection()){ radioSelectedId = 1; }
            else if(buttonR2.getSelection()){ radioSelectedId = 2; }
            else if(buttonR3.getSelection()){ radioSelectedId = 3; }
            // メッセージボックス
            MessageBox msgbox = new MessageBox(shell,SWT.OK);
            msgbox.setMessage(String.format("check = %b\ntoggle = %b\nradio = %d",
                    buttonCheck.getSelection(), buttonToggle.getSelection(), radioSelectedId));
            msgbox.open();
        }
        @Override
        public void widgetDefaultSelected(SelectionEvent e) {
        }
    });
    shell.open();
    while (!shell.isDisposed()) {
        if (!display.readAndDispatch()) {
            display.sleep();
        }
    }
    display.dispose();
}
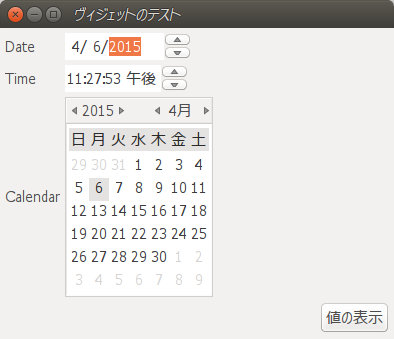
日時 (DateTime)
日付、時刻の表示形式はどこかで設定できるはずだが…

    // レイアウトに配置する要素(ヴィジェット)
    Label label = new Label(shell, SWT.NONE);
    label.setText("Date");
    DateTime date = new DateTime(shell, SWT.DATE);
    Calendar cal = Calendar.getInstance();
    date.setDate(cal.get(cal.YEAR), cal.get(cal.MONTH), cal.get(cal.DAY_OF_MONTH));
    label = new Label(shell, SWT.NONE);     // 余白領域を最大幅で表示
    label.setLayoutData(new GridData(GridData.FILL_HORIZONTAL));

    label = new Label(shell, SWT.NONE);
    label.setText("Time");
    DateTime time = new DateTime(shell, SWT.TIME);
    time.setDate(cal.get(cal.HOUR), cal.get(cal.MINUTE), cal.get(cal.SECOND));
    label = new Label(shell, SWT.NONE);     // 余白領域を最大幅で表示
    label.setLayoutData(new GridData(GridData.FILL_HORIZONTAL));

    label = new Label(shell, SWT.NONE);
    label.setText("Calendar");
    DateTime calendar = new DateTime(shell, SWT.CALENDAR);
    calendar.setDate(cal.get(cal.HOUR), cal.get(cal.MINUTE), cal.get(cal.SECOND));
    label = new Label(shell, SWT.NONE);     // 余白領域を最大幅で表示
    label.setLayoutData(new GridData(GridData.FILL_HORIZONTAL));
  〜 略 〜
    button.addSelectionListener(new SelectionListener() {
        @Override
        public void widgetSelected(SelectionEvent e) {
            // メッセージボックス
            MessageBox msgbox = new MessageBox(shell,SWT.OK);
            msgbox.setMessage(String.format("date = %4d/%02d/%02d",
                    date.getYear(), date.getMonth(), date.getDay()));
            msgbox.open();
        }
        @Override
        public void widgetDefaultSelected(SelectionEvent e) {
        }
    });
ツールバー (Toolbar)

public static void main(String[] args) {
    Display display = new Display();
    Shell shell = new Shell(display, SWT.SHELL_TRIM);
    this.setSize(400, 100);
    this.setText("ヴィジェットのテスト");
    GridLayout layout = new GridLayout(3, false);
    shell.setLayout(layout);
    // レイアウトに配置する要素(ヴィジェット)
    ToolBar toolbar = new ToolBar(shell,SWT.NONE);
    ToolItem item1 = new ToolItem(toolbar,SWT.PUSH);
    item1.setText("ツール 1");
    ToolItem item2 = new ToolItem(toolbar,SWT.PUSH);
    item2.setText("ツール 2");
    ToolItem sep = new ToolItem(toolbar,SWT.SEPARATOR);     // セパレーター
    ToolItem item3 = new ToolItem(toolbar,SWT.PUSH);
    item3.setText("ツール 3");
    GridData gridData = new GridData(GridData.HORIZONTAL_ALIGN_BEGINNING);
    gridData.horizontalSpan = 3;    // 1行目を3カラム結合してツールバー専用とする
    toolbar.setLayoutData(gridData);
    Text t = new Text(shell, SWT.READ_ONLY);
    t.setText("ツールバーはまだクリックされていません");
    // ツールバーのリスナー
    Listener listener = new Listener() {
        @Override
        public void handleEvent(Event event) {
            ToolItem item = (ToolItem) event.widget;
            t.setText("選択:" + item.getText());
        }
    };
    item1.addListener(SWT.Selection, listener);
    item2.addListener(SWT.Selection, listener);
    item3.addListener(SWT.Selection, listener);
    shell.open();
    while (!shell.isDisposed()) {
        if (!display.readAndDispatch()) {
            display.sleep();
        }
    }
    display.dispose();
}