Java SWTライブラリを用いてダイアログ・ボックスを表示する場合の、画面デザインのメモ
GridLayout
ベースとなるプログラムは次のようなものになる。GridLayout(COLUMN, IS_EqualWidth);で、第1引数はグリッドのカラム数、第2引数はグリッドを等間隔にする設定。
要素は、左上から始まり右方向へ、グリッドのカラム数に達すれば次の行に配置されてゆく。
public static void main(String[] args) {
    Display display = new Display();
    Shell shell = new Shell(display, SWT.SHELL_TRIM);
    // レイアウト全体の基本設計
    shell.setSize(320, 150);
    shell.setText("GridLayoutのテスト");
    GridLayout layout = new GridLayout(3, false);   // 横3カラムのグリッド
    shell.setLayout(layout);
    // レイアウトに配置する要素
    Text t = new Text(shell, SWT.BORDER);
    t.setText("text 1");
    t = new Text(shell, SWT.BORDER);
    t.setText("text 2");
    t = new Text(shell, SWT.BORDER);
    t.setText("text 3");
    t = new Text(shell, SWT.BORDER);
    t.setText("text 4");
    t = new Text(shell, SWT.BORDER);
    t.setText("text 5");
    t = new Text(shell, SWT.BORDER);
    t.setText("text 6");
    t = new Text(shell, SWT.BORDER);
    t.setText("text 7");
    t = new Text(shell, SWT.BORDER);
    t.setText("text 8");
    t = new Text(shell, SWT.BORDER);
    t.setText("text 9");
    // レイアウトの表示
    shell.open();
    while (!shell.isDisposed()) {
        if (!display.readAndDispatch()) {
            display.sleep();
        }
    }
    // 終了処理
    display.dispose();
}
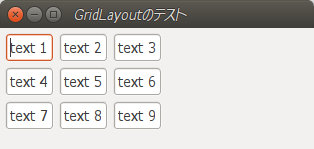
グリッドに配置される要素の位置やサイズはSWTのClass GridDataの各属性値で設定できる。(GridDataの言語ヘルプ)
サイズ変更の設定
・FILL_HORIZONTAL : 左右方向に最大幅まで拡張
・FILL_VERTICAL : 上下方向に最大幅まで拡張
・FILL_BOTH : 左右・上下両方向に最大幅まで拡張
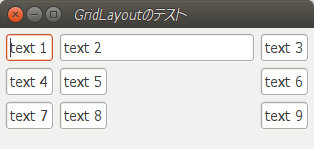
        t = new Text(shell, SWT.BORDER);
        t.setText("text 2");
        t.setLayoutData(new GridData(GridData.FILL_HORIZONTAL));
右寄せ・左寄せ・中央の設定
・HORIZONTAL_ALIGN_BEGINNING : 左寄せ
・HORIZONTAL_ALIGN_CENTER : 中央寄せ
・HORIZONTAL_ALIGN_END : 右寄せ
・VERTICAL_ALIGN_BEGINNING : 上寄せ
・VERTICAL_ALIGN_CENTER : 中央寄せ
・VERTICAL_ALIGN_END : 下寄せ
・HORIZONTAL_ALIGN_FILL : 左右幅最大
・VERTICAL_ALIGN_FILL : 上下幅最大
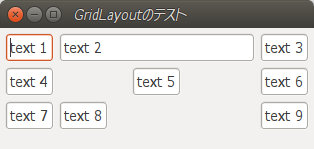
        t = new Text(shell, SWT.BORDER);
        t.setText("text 5");
        t.setLayoutData(new GridData(GridData.HORIZONTAL_ALIGN_CENTER));
text 2 のテキスト領域をFILL_HORIZONTALで最大幅にした状態で、text 5のテキスト領域の中央寄せを確認している。
等間隔グリッド
GridLayoutで等間隔グリッドを使う。(GridLayoutの言語ヘルプ)
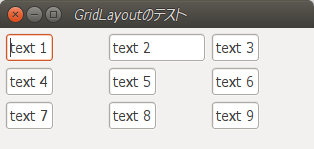
等間隔

等間隔ではない
グリッドを等間隔にするには、GridLayoutの第2引数をtrueとすればよい。
        GridLayout layout = new GridLayout(3, true);
        shell.setLayout(layout);
グリッド領域の結合
・GridData.horizontalSpan = n : 横方向のグリッド(セル)結合数
・GridData.verticalSpan = n : 縦方向のグリッド(セル)結合数
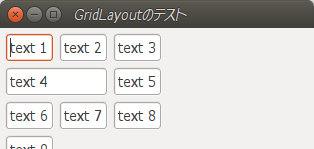
        t = new Text(shell, SWT.BORDER);
        t.setText("text 4");
        GridData gridData = new GridData(GridData.HORIZONTAL_ALIGN_FILL);
        gridData.horizontalSpan = 2;
        t.setLayoutData(gridData);
幅・高さの強制的な指定
・gridData.widthHint = 幅 px;
・gridData.heightHint = 高さ px;
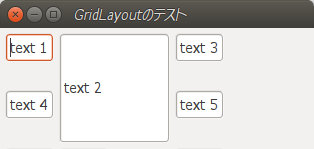
        t = new Text(shell, SWT.BORDER);
        t.setText("text 2");
        GridData gridData = new GridData();
        gridData.widthHint = 100;
        gridData.heightHint = 100;
        gridData.verticalSpan = 2;   // 縦方向に2グリッド(セル)結合
        t.setLayoutData(gridData);
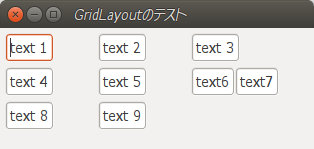
Compositeによるグループ化
        t = new Text(shell, SWT.BORDER);
        t.setText("text 5");
        Composite composite = new Composite(shell, SWT.NONE);
        composite.setLayout(new FillLayout(SWT.HORIZONTAL));
        t = new Text(composite, SWT.BORDER);
        t.setText("text6");
        t = new Text(composite, SWT.BORDER);
        t.setText("text7");
        t = new Text(shell, SWT.BORDER);
        t.setText("text 8");
FillLayout
縦または横に要素を均等に一列に並べるレイアウト。ベースとなるプログラムは次のようなものになる。レイアウト生成時にSWT.HORIZONTALを指定すれば横方向に要素を配置、SWT.VERTICALを指定すれば縦方向に要素を配置する。
public static void main(String[] args) {
    Display display = new Display();
    Shell shell = new Shell(display, SWT.SHELL_TRIM);
    // レイアウト全体の基本設計
    shell.setSize(300, 80);
    shell.setText("FillLayoutのテスト");
    shell.setLayout(new FillLayout(SWT.HORIZONTAL));
    // レイアウトに配置する要素
    Text t = new Text(shell, SWT.BORDER);
    t.setText("text 1");
    t = new Text(shell, SWT.BORDER);
    t.setText("text 2");
    t = new Text(shell, SWT.BORDER);
    t.setText("text 3");
    // レイアウトの表示
    shell.open();
    while (!shell.isDisposed()) {
        if (!display.readAndDispatch()) {
            display.sleep();
        }
    }
    // 終了処理
    display.dispose();
}

詳細は、FillLayoutの言語ヘルプを参照。
要素間の間隔、要素のマージン
・FillLayout.spacing = n : 要素間の間隔 px
・FillLayout.marginHeight = n : 上下マージン px
・FillLayout.marginWidth = n : 左右マージン px

        shell.setSize(300, 80);
        this.setText("FillLayoutのテスト");
        FillLayout layout = new FillLayout(SWT.HORIZONTAL);
        layout.spacing = 10;
        shell.setLayout(layout);
RowLayout
FillLayoutが均等に要素を並べるのに対し、RowLayoutは均等幅(高さ)となならず順に並べるだけのレイアウト。
public static void main(String[] args) {
    Display display = new Display();
    Shell shell = new Shell(display, SWT.SHELL_TRIM);
    // レイアウト全体の基本設計
    shell.setSize(300, 80);
    shell.setText("RowLayoutのテスト");
    shell.setLayout(new RowLayout(SWT.HORIZONTAL));
    // レイアウトに配置する要素
    Text t = new Text(shell, SWT.BORDER);
    t.setText("text 1");
    t = new Text(shell, SWT.BORDER);
    t.setText("text 2");
    t = new Text(shell, SWT.BORDER);
    t.setText("text 3");
    // レイアウトの表示
    shell.open();
    while (!shell.isDisposed()) {
        if (!display.readAndDispatch()) {
            display.sleep();
        }
    }
    // 終了処理
    display.dispose();
}

要素サイズの指定
        Text t = new Text(shell, SWT.BORDER);
        t.setText("text 1");
        t.setLayoutData(new RowData(100, 25));
