Swingの基本コンポーネントの使い方メモ
- 1行テキストボックス (JTextField)
- スライダー (JSlider)
- スピナー (JSpinner)
- コンボボックス (JComboBox)
- リストボックス (JList)
- ラジオボタン、チェックボックス、トグルボタン (JRadioButton, JCheckBox, JToggleButton)
1行テキストボックス (JTextField)
いわゆるテキストボックス。1行のテキストの編集を可能にする軽量コンポーネントがJTextField。Oracleの公式言語マニュアルは→ 「クラスJTextField」。
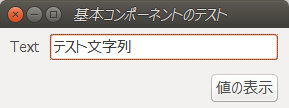
public static void main(String[] args) {
    JFrame frame = new JFrame();
    frame.setDefaultCloseOperation(JFrame.EXIT_ON_CLOSE);
    frame.setTitle("基本コンポーネントのテスト");

    // 親コンテナ(この中に、子コンテナとしてpanel2つを上下配置する)
    Container container = frame.getContentPane();
    container.setLayout(new GridLayout(0, 1));
    frame.setContentPane(container);
    // 1行目のテキスト入力コンポーネントを表示する
    JPanel panel_1 = new JPanel();
    panel_1.setLayout(new FlowLayout(FlowLayout.LEFT, 10, 5));
    panel_1.add(new JLabel("Text", JLabel.LEFT));
    JTextField text = new JTextField("テスト文字列", 20);
    panel_1.add(text);
    container.add(panel_1);
    // 2行目のボタンを表示する
    JPanel panel_2 = new JPanel();
    panel_2.setLayout(new FlowLayout(FlowLayout.RIGHT, 10, 5));
    JButton button = new JButton("値の表示");
    panel_2.add(button);
    container.add(panel_2);
    // ボタンの動作設定
    button.addActionListener(new ActionListener() {
        @Override
        public void actionPerformed(ActionEvent e) {
            // メッセージ ダイアログを表示する
            JOptionPane.showMessageDialog(frame, text.getText());
        }
    });

    // 実行環境OSにあったUIを適用する
    try {
        UIManager.setLookAndFeel(UIManager.getSystemLookAndFeelClassName());
        SwingUtilities.updateComponentTreeUI(frame);
    } catch (Exception e) {
    }
    // メイン ダイアログの表示
    frame.pack();
    frame.setVisible(true);
}
スライダー (JSlider)
指定された区間内でノブをスライドすることによりグラフィカルに値を選択できるようにするコンポーネント。Oracleの公式言語マニュアルは→ 「クラスJSlider」
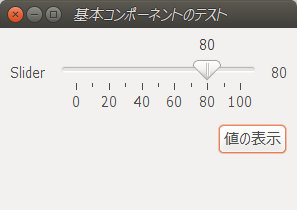
public static void main(String[] args) {
    JFrame frame = new JFrame();
    frame.setDefaultCloseOperation(JFrame.EXIT_ON_CLOSE);
    frame.setTitle("基本コンポーネントのテスト");
    // 親コンテナ(この中に、子コンテナとしてpanel2つを上下配置する)
    Container container = frame.getContentPane();
    container.setLayout(new GridLayout(0, 1));
    frame.setContentPane(container);
    // 1行目のスライダー入力コンポーネントを表示する
    JPanel panel_1 = new JPanel();
    panel_1.setLayout(new FlowLayout(FlowLayout.LEFT, 10, 5));
    panel_1.add(new JLabel("Slider", JLabel.LEFT));
    JSlider slider = new JSlider(0, 100, 50);
    slider.setMajorTickSpacing(20);     // 大目盛り間隔
    slider.setMinorTickSpacing(10);     // 小目盛り間隔
    slider.setPaintTicks(true);         // 目盛り線を表示
    slider.setPaintLabels(true);        // 大目盛りの値を表示
    slider.setSnapToTicks(true);        // 目盛りのある位置のみに止まる
    panel_1.add(slider);
    JLabel label_slider = new JLabel("000");
    panel_1.add(label_slider);
    label_slider.setText(String.valueOf(slider.getValue()));
    container.add(panel_1);
    // 2行目のボタンを表示する
    JPanel panel_2 = new JPanel();
    panel_2.setLayout(new FlowLayout(FlowLayout.RIGHT, 10, 5));
    JButton button = new JButton("値の表示");
    panel_2.add(button);
    container.add(panel_2);
    // ボタンの動作設定
    button.addActionListener(new ActionListener() {
        @Override
        public void actionPerformed(ActionEvent e) {
            // メッセージ ダイアログを表示する
            JOptionPane.showMessageDialog(frame, String.format("値=%d", slider.getValue()));
        }
    });
    // スライダー移動時の動作設定
    slider.addChangeListener(new ChangeListener() {
        @Override
        public void stateChanged(ChangeEvent e) {
            // スライダーが現在示す値を表示
            label_slider.setText(String.valueOf(slider.getValue()));
        }
    });

    // 実行環境OSにあったUIを適用する
    try {
        UIManager.setLookAndFeel(UIManager.getSystemLookAndFeelClassName());
        SwingUtilities.updateComponentTreeUI(frame);
    } catch (Exception e) {
    }
    // メイン ダイアログの表示
    frame.pack();
    frame.setVisible(true);
}
スピナー (JSpinner)
上/下矢印ボタンが付いたテキストボックス。Oracleの公式言語マニュアルは → 「クラスJSpinner」
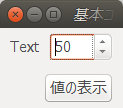
値の変化率や最小・最大値の設定はspinner.setModel(SpinnerNumberModel model)で行う。また、表示される値のフォーマットはspinner.setEditor(JSpinner.NumberEditor editor)で行う。
public static void main(String[] args) {
    JFrame frame = new JFrame();
    frame.setDefaultCloseOperation(JFrame.EXIT_ON_CLOSE);
    frame.setTitle("基本コンポーネントのテスト");
    // 親コンテナ(この中に、子コンテナとしてpanel2つを上下配置する)
    Container container = frame.getContentPane();
    container.setLayout(new GridLayout(0, 1));
    frame.setContentPane(container);
    // 1行目のスピナー コンポーネントを表示する
    JPanel panel_1 = new JPanel();
    panel_1.setLayout(new FlowLayout(FlowLayout.LEFT, 10, 5));
    panel_1.add(new JLabel("Text", JLabel.LEFT));
    JSpinner spinner = new JSpinner();
    // スピナーの値の初期値、変化最小値・最大値、変化数を設定する
    SpinnerNumberModel model = new  SpinnerNumberModel(50, 0, 100, 10);
    spinner.setModel(model);
    panel_1.add(spinner);
    container.add(panel_1);
    // 2行目のボタンを表示する
    JPanel panel_2 = new JPanel();
    panel_2.setLayout(new FlowLayout(FlowLayout.RIGHT, 10, 5));
    JButton button = new JButton("値の表示");
    panel_2.add(button);
    container.add(panel_2);
    // ボタンの動作設定
    button.addActionListener(new ActionListener() {
        @Override
        public void actionPerformed(ActionEvent e) {
            // メッセージ ダイアログを表示する
            JOptionPane.showMessageDialog(frame, String.valueOf(spinner.getValue()));
        }
    });

    // 実行環境OSにあったUIを適用する
    try {
        UIManager.setLookAndFeel(UIManager.getSystemLookAndFeelClassName());
        SwingUtilities.updateComponentTreeUI(frame);
    } catch (Exception e) {
    }
    // メイン ダイアログの表示
    frame.pack();
    frame.setVisible(true);
}
値のフォーマットの例として

    〜 略 〜
    JSpinner spinner = new JSpinner();
    // スピナーの値の初期値、変化最小値・最大値、変化数を設定する
    SpinnerNumberModel model = new  SpinnerNumberModel(5000, 0, 10000, 1000);
    spinner.setModel(model);
    JSpinner.NumberEditor editor = new JSpinner.NumberEditor(spinner, "#,### 円");
    spinner.setEditor(editor);
    panel_1.add(spinner);
    〜 略 〜
コンボボックス (JComboBox)
Oracleの公式言語マニュアルは→ 「クラスJComboBox」
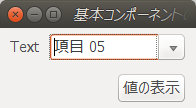
public static void main(String[] args) {
    JFrame frame = new JFrame();
    frame.setDefaultCloseOperation(JFrame.EXIT_ON_CLOSE);
    frame.setTitle("基本コンポーネントのテスト");
    // 親コンテナ(この中に、子コンテナとしてpanel2つを上下配置する)
    Container container = frame.getContentPane();
    container.setLayout(new GridLayout(0, 1));
    frame.setContentPane(container);
    // 1行目のスピナー コンポーネントを表示する
    JPanel panel_1 = new JPanel();
    panel_1.setLayout(new FlowLayout(FlowLayout.LEFT, 10, 5));
    panel_1.add(new JLabel("Text", JLabel.LEFT));
    JComboBox<String> combo = new JComboBox<String>();
    combo.setEditable(true);    // 値を編集可能にする
    // コンボボックスの初期データを設定する
    for(int i=0; i<10; i++){ combo.addItem(String.format("項目 %02d", i+1)); }
    combo.setSelectedIndex(4);  // 初期選択
    panel_1.add(combo);
    container.add(panel_1);
    // 2行目のボタンを表示する
    JPanel panel_2 = new JPanel();
    panel_2.setLayout(new FlowLayout(FlowLayout.RIGHT, 10, 5));
    JButton button = new JButton("値の表示");
    panel_2.add(button);
    container.add(panel_2);
    // ボタンの動作設定
    button.addActionListener(new ActionListener() {
        @Override
        public void actionPerformed(ActionEvent e) {
            // メッセージ ダイアログを表示する
            JOptionPane.showMessageDialog(frame, combo.getSelectedItem().toString());
        }
    });

    // 実行環境OSにあったUIを適用する
    try {
        UIManager.setLookAndFeel(UIManager.getSystemLookAndFeelClassName());
        SwingUtilities.updateComponentTreeUI(frame);
    } catch (Exception e) {
    }
    // メイン ダイアログの表示
    frame.pack();
    frame.setVisible(true);
}
リストボックス (JList)
Oracleの公式言語マニュアルは→ 「クラスJList<E>」
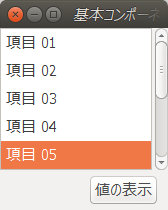
リストボックスをスクロールして表示させたい場合、次のソースコードで緑着色部のように、JScrollPaneを用いる必要がある。
public static void main(String[] args) {
    JFrame frame = new JFrame();
    frame.setDefaultCloseOperation(JFrame.EXIT_ON_CLOSE);
    frame.setTitle("基本コンポーネントのテスト");
    // 親コンテナ(この中に、子コンテナとしてpanel2つを上下配置する)
    Container container = frame.getContentPane();
    container.setLayout(new BoxLayout(container, BoxLayout.Y_AXIS));
    frame.setContentPane(container);
    // 1行目のスリストボックス コンポーネントを表示する
    JPanel panel_1 = new JPanel();
    panel_1.setLayout(new BorderLayout());
    panel_1.add(new JLabel("Text", JLabel.LEFT));
    JList<String> list = new JList<String>();
    // リストボックスの初期データを設定する
    DefaultListModel<String> model = new DefaultListModel<String>();
    for (int i = 0; i < 10; i++) {
        model.addElement(String.format("項目 %02d", i + 1));
    }
    list.setModel(model);
    // リストボックスの表示形態(初期選択、表示行数)
    list.setSelectedIndex(4);
    list.setVisibleRowCount(5);
    list.setLayoutOrientation(JList.VERTICAL);
    // リストボックスのスクロール領域設定
    JScrollPane scroll = new JScrollPane();
    scroll.getViewport().setView(list);
    panel_1.add(scroll);
    container.add(panel_1);
    // 2行目のボタンを表示する
    JPanel panel_2 = new JPanel();
    panel_2.setLayout(new FlowLayout(FlowLayout.RIGHT, 10, 5));
    JButton button = new JButton("値の表示");
    panel_2.add(button);
    container.add(panel_2);
    // ボタンの動作設定
    button.addActionListener(new ActionListener() {
        @Override
        public void actionPerformed(ActionEvent e) {
            // メッセージ ダイアログを表示する
            JOptionPane.showMessageDialog(frame, list.getSelectedValue()
                    .toString());
        }
    });

    // 実行環境OSにあったUIを適用する
    try {
        UIManager.setLookAndFeel(UIManager.getSystemLookAndFeelClassName());
        SwingUtilities.updateComponentTreeUI(frame);
    } catch (Exception e) {
    }
    // メイン ダイアログの表示
    frame.pack();
    frame.setVisible(true);
}
ラジオボタン、チェックボックス、トグルボタン (JRadioButton, JCheckBox, JToggleButton)
Oracleの公式言語マニュアルは→ 「クラスJRadioButton」 「クラスJCheckBox」 「クラスJToggleButton」
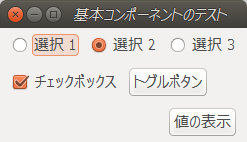
赤の部分がラジオボタン、緑の部分がチェックボックス、青の部分がトグルボタンの処理。
public static void main(String[] args) {
    JFrame frame = new JFrame();
    frame.setDefaultCloseOperation(JFrame.EXIT_ON_CLOSE);
    frame.setTitle("基本コンポーネントのテスト");
    // 親コンテナ(この中に、子コンテナとしてpanel2つを上下配置する)
    Container container = frame.getContentPane();
    container.setLayout(new BoxLayout(container, BoxLayout.Y_AXIS));
    frame.setContentPane(container);
    // ラジオボタン
    JPanel panel_1 = new JPanel();
    panel_1.setLayout(new FlowLayout(FlowLayout.LEFT, 10, 5));
    ButtonGroup radioGroup = new ButtonGroup();
    JRadioButton radio_1 = new JRadioButton("選択 1");
    JRadioButton radio_2 = new JRadioButton("選択 2");
    JRadioButton radio_3 = new JRadioButton("選択 3");
    radioGroup.add(radio_1);
    radioGroup.add(radio_2);
    radioGroup.add(radio_3);
    panel_1.add(radio_1);
    panel_1.add(radio_2);
    panel_1.add(radio_3);
    container.add(panel_1);
    radio_2.setSelected(true);
    // チェックボックス
    JPanel panel_2 = new JPanel();
    panel_2.setLayout(new FlowLayout(FlowLayout.LEFT, 10, 5));
    JCheckBox checkbox = new JCheckBox("チェックボックス");
    checkbox.setSelected(true);
    panel_2.add(checkbox);
    // トグルボタン
    JToggleButton toggle = new JToggleButton("トグルボタン");
    panel_2.add(toggle);
    container.add(panel_2);
    // 2行目のボタンを表示する
    JPanel panel_3 = new JPanel();
    panel_3.setLayout(new FlowLayout(FlowLayout.RIGHT, 10, 5));
    JButton button = new JButton("値の表示");
    panel_3.add(button);
    container.add(panel_3);
    // ボタンの動作設定
    button.addActionListener(new ActionListener() {
        @Override
        public void actionPerformed(ActionEvent e) {
            // メッセージ ダイアログを表示する
            String tmpStr;
            if (radio_1.isSelected() == true)
                tmpStr = radio_1.getText();
            else if (radio_2.isSelected() == true)
                tmpStr = radio_2.getText();
            else if (radio_3.isSelected() == true)
                tmpStr = radio_3.getText();
            else
                tmpStr = "未選択";
            String msgStr = String.format(
                    "ラジオボタン=%s\nチェックボックス=%s\nトグルボタン=%s", tmpStr,
                    checkbox.isSelected() == true ? "ON" : "OFF",
                    toggle.isSelected() == true ? "ON" : "OFF");
            JOptionPane.showMessageDialog(frame, msgStr);
        }
    });

    // 実行環境OSにあったUIを適用する
    try {
        UIManager.setLookAndFeel(UIManager.getSystemLookAndFeelClassName());
        SwingUtilities.updateComponentTreeUI(frame);
    } catch (Exception e) {
    }
    // メイン ダイアログの表示
    frame.pack();
    frame.setVisible(true);
}