日付、時刻を入力するためのダイアログの作成方法
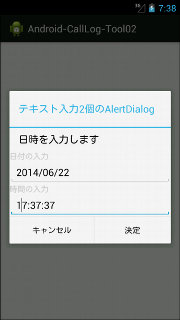
AlertDialogでテキストボックスを用いる方法

テキストボックスを2つ表示するためには、レイアウト(LinearLayout)にテキストボックスを入れて、そのレイアウトをAlertDialogにセットするという2段階の実装方法を取る
import android.R.integer;
import android.support.v7.app.ActionBarActivity;
import android.support.v7.app.ActionBar;
import android.support.v4.app.Fragment;
import android.os.Bundle;
import android.view.LayoutInflater;
import android.view.Menu;
import android.view.MenuItem;
import android.view.View;
import android.view.ViewGroup;
import android.os.Build;

import android.app.AlertDialog;
import android.content.DialogInterface;
import android.content.res.ColorStateList;
import android.widget.LinearLayout;
import android.widget.TextView;
import android.widget.EditText;
import android.text.InputType;
import android.graphics.Color;

import java.util.Calendar;
import java.text.*;
import java.util.Date;

// DatePickerDialog または TimePickerDialogを使う場合
import android.app.DatePickerDialog;
import android.app.TimePickerDialog;
import android.widget.TimePicker;
import android.widget.DatePicker;

import android.util.Log;

public class MainActivity extends ActionBarActivity {

    @Override
    protected void onCreate(Bundle savedInstanceState) {
        super.onCreate(savedInstanceState);
        setContentView(R.layout.activity_main);
    }

    @Override
    public boolean onCreateOptionsMenu(Menu menu) {
        // Inflate the menu; this adds items to the action bar if it is present.
        getMenuInflater().inflate(R.menu.main, menu);
        return true;
    }

    @Override
    public boolean onOptionsItemSelected(MenuItem item) {
        // Handle action bar item clicks here. The action bar will
        // automatically handle clicks on the Home/Up button, so long
        // as you specify a parent activity in AndroidManifest.xml.
        int id = item.getItemId();
        if (id == R.id.action_settings) {
            return true;
        }
        // 「日時入力のテスト」メニュー
        else if (id == R.id.menu_datetime_test) {
            // DateTime_Test_func();
            Time_Test_func();
        }
        // 「プログラム終了」メニューが押された場合
        else if (id == R.id.menu_quit) {
            android.os.Process.killProcess(android.os.Process.myPid());
            System.exit(1);
        }
        return super.onOptionsItemSelected(item);
    }

    private void DateTime_Test_func(){
        final LinearLayout layout = new LinearLayout(MainActivity.this);
        layout.setOrientation(LinearLayout.VERTICAL);

        TextView text1 = new TextView(this);
        text1.setText("日付の入力");
        text1.setTextColor(Color.LTGRAY);
        layout.addView(text1);

        final EditText editViewDate = new EditText(MainActivity.this);
        editViewDate.setLines(1);   // 1行
        editViewDate.setInputType(InputType.TYPE_CLASS_DATETIME | InputType.TYPE_DATETIME_VARIATION_DATE);
        SimpleDateFormat dateFmt = new SimpleDateFormat("yyyy/MM/dd");
        Date dateNow = new Date();
        editViewDate.setText(dateFmt.format(dateNow));
        layout.addView(editViewDate);

        TextView text2 = new TextView(this);
        text2.setText("時間の入力");
        text2.setTextColor(Color.LTGRAY);
        layout.addView(text2);

        final EditText editViewTime = new EditText(MainActivity.this);
        editViewTime.setLines(1);   // 1行
        editViewTime.setInputType(InputType.TYPE_CLASS_DATETIME | InputType.TYPE_DATETIME_VARIATION_TIME);
        dateFmt.applyPattern("HH:mm:ss");
        editViewTime.setText(dateFmt.format(dateNow));
        layout.addView(editViewTime);

        // AlertDialogを構築する
        AlertDialog.Builder dlg = new AlertDialog.Builder(this);
        dlg.setTitle("テキスト入力2個のAlertDialog");
        dlg.setMessage("日時を入力します");
        dlg.setView(layout);

        dlg.setPositiveButton("決定", new DialogInterface.OnClickListener(){
            public void onClick(DialogInterface dialog, int which) {
                //Yesボタンが押された時の処理
                Log.d("EditViewDate", editViewDate.getText().toString());
                Log.d("EditViewTime", editViewTime.getText().toString());
                Calendar cal = Calendar.getInstance();
                cal = Str2Date(editViewDate.getText().toString(), editViewTime.getText().toString());
                SimpleDateFormat sdateFmt = new SimpleDateFormat("yyyy年MM月dd日 HH時mm分ss秒");
                Log.d("EditViewDateTime", sdateFmt.format(cal.getTime()));
            }});
        dlg.setNegativeButton("キャンセル", new DialogInterface.OnClickListener(){
            public void onClick(DialogInterface dialog, int which) {
                //Noボタンが押された時の処理
            }});
        // AlertDialogを表示する
        dlg.show();
    }
}
文字列を日付、時刻に分解してCalendarクラスに格納する関数は
    private Calendar Str2Date(String StrDate, String StrTime){
        Calendar calendarResult = Calendar.getInstance();
        calendarResult.clear();
        SimpleDateFormat format = new SimpleDateFormat("yyyy/MM/dd HH:mm:ss");
        format.setLenient(false);   // 日時チェックを厳密に行う
        ParsePosition pos = new ParsePosition(0);
        try{
            calendarResult.setTime(format.parse(StrDate + " " + StrTime, pos));
        } catch(Exception e){
            calendarResult.setTimeInMillis(0);
            Log.d("Calendar", "Lenient check ERROR");
        };
        return(calendarResult);
    }
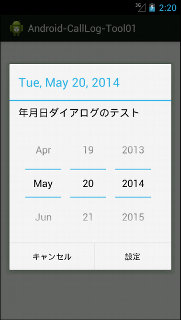
DatePickerDialogを用いて年月日を扱う方法

ボタン関数のOnClickListner内で、DatePickerから日付を得るために、DatePickerインスタンスを一旦外に取り出して保存しておくのが、datePicker = datePickerDialog.getDatePicker();の部分。これはAndroid 3.0以降でしかサポートされないので、2.3以前でもサポートされる方法は、次のセクションのTimePickerDialogの例のような方法を取れば良い。
    private void Date_Test_func(){
        DatePickerDialog datePickerDialog;
        // 日付設定時のリスナ作成
        DatePickerDialog.OnDateSetListener DateSetListener = new DatePickerDialog.OnDateSetListener() {
            public void onDateSet(android.widget.DatePicker datePicker, int year,
                    int monthOfYear, int dayOfMonth) {
                // OKボタン、キャンセルボタンにかかわらず、ダイアログが閉じるときに呼び出される
                // *** Androidシステムのバグにより、
                //     OKボタンが押された後に、onDateSetが2回呼びだされることがある ***
                // ログにデバッグ出力
                Log.d("DatePicker", "year=" + String.valueOf(year) + " month=" + String.valueOf(monthOfYear + 1)
                        + " day=" + String.valueOf(dayOfMonth));
            }
        };
        // 現在日時をセットする
        Calendar calNow = Calendar.getInstance();
        datePickerDialog = new DatePickerDialog(this, DateSetListener,
                calNow.get(Calendar.YEAR), calNow.get(Calendar.MONTH), calNow.get(Calendar.DAY_OF_MONTH));
        // ボタンのOnClickListener関数内で用いるため、widgetをクラス変数にセットする
        final DatePicker datePicker;
        datePicker = datePickerDialog.getDatePicker();  // API11(Android 3)以降でサポート
        // 「キャンセル ボタン」を追加する
        datePickerDialog.setButton(
                DialogInterface.BUTTON_NEGATIVE,
                "キャンセル",
                new DialogInterface.OnClickListener() {
                  public void onClick(DialogInterface dialog, int which) {
                    // Negative Button がクリックされた時の動作
                  }
                }
              );
        // デフォルトで表示される「OK ボタン」処理を上書き
        datePickerDialog.setButton(
          DialogInterface.BUTTON_POSITIVE,
            "設定",
            new DialogInterface.OnClickListener() {
              public void onClick(DialogInterface dialog, int which) {
                  // Positive Button がクリックされた時の動作
                  // とりあえず、ログに書き出す
                  Log.d("DatePicker", "Year=" + String.valueOf(datePicker.getYear()) +
                          ", Month=" + String.valueOf(datePicker.getMonth() + 1) +
                          ", Day=" + String.valueOf(datePicker.getDayOfMonth()));
              }
            }
        );
        datePickerDialog.setMessage("年月日ダイアログのテスト");
        // ダイアログを表示する(Androidの場合モードレスダイアログ)
        datePickerDialog.show();
    }
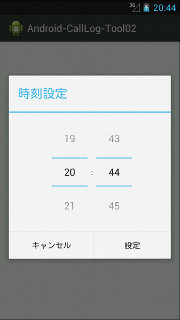
TimePickerDialogを用いて時・分を扱う方法

DatePickerDialogのようにインスタンスを得る関数(getDatePicker();)が存在しないため、OKボタンを押された時のフラグ変数を定義する。変数は1個で良いのだが、Javaコンパイラのエラーが出るため、配列として定義し、その1個目のみを使うというエラーの無理矢理回避を行っている。
    private void Time_Test_func(){
        TimePickerDialog timePickerDialog;
        // OKボタンを押した時 true をセットする(配列にするのは、『エンクロージング型に定義されているため、
        //      ローカル変数 を代入することができません』エラーの回避のため)
        final Boolean flagOk[] = new Boolean[1];
        flagOk[0] = false;
        //時刻設定時のリスナ登録
        TimePickerDialog.OnTimeSetListener TimeSetListener = new TimePickerDialog.OnTimeSetListener() {
            public void onTimeSet(TimePicker view, int hourOfDay, int minute) {
                // OKボタン、キャンセルボタンにかかわらず、ダイアログが閉じるときに呼び出される
                // *** Androidシステムのバグにより、
                //     OKボタンが押された後に、onDateSetが2回呼びだされることがある ***
                // ログにデバッグ出力
                if(flagOk[0]){
                    Log.d("TimePicker","hourOfDay=" + String.valueOf(hourOfDay) + " minute=" + String.valueOf(minute));
                    flagOk[0] = false;
                }
                else{
                    Log.d("TimePicker","(キャンセルボタン またはAndroidバグでonSetTimeの呼び出しが2回めのためブロック");
                }
            }
        };
        // 現在日時をセットする
        Calendar calNow = Calendar.getInstance();
        timePickerDialog = new TimePickerDialog(this, TimeSetListener,
                calNow.get(Calendar.HOUR_OF_DAY), calNow.get(Calendar.MINUTE), true);
        // 「キャンセル ボタン」を追加する
        timePickerDialog.setButton(
                DialogInterface.BUTTON_NEGATIVE,
                "キャンセル",
                new DialogInterface.OnClickListener() {
                  public void onClick(DialogInterface dialog, int which) {
                    // Negative Button がクリックされた時の動作
                  }
                }
              );
        // デフォルトで表示される「OK ボタン」処理を上書き
        timePickerDialog.setButton(
          DialogInterface.BUTTON_POSITIVE,
            "設定",
            new DialogInterface.OnClickListener() {
              public void onClick(DialogInterface dialog, int which) {
                  // Positive Button がクリックされた時の動作
                  flagOk[0] = true;
              }
            }
        );
        // ダイアログを表示する(Androidの場合モードレスダイアログ)
        timePickerDialog.show();
    }
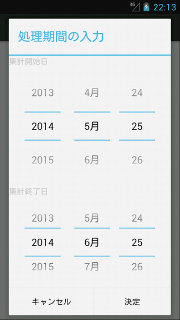
AlertDialogでDatePickerを2つ表示する

    private Calendar[] Add_Random_CallLog(){
        final LinearLayout layout = new LinearLayout(MainActivity.this);
        layout.setOrientation(LinearLayout.VERTICAL);

        TextView text1 = new TextView(this);
        text1.setText("集計開始日");
        text1.setTextColor(Color.LTGRAY);
        layout.addView(text1);

        final DatePicker date1 = new DatePicker(MainActivity.this);
        date1.setCalendarViewShown(false);
        Calendar calNow = Calendar.getInstance();
        calNow.add(Calendar.MONTH, -1);
        date1.updateDate(calNow.get(Calendar.YEAR), calNow.get(Calendar.MONTH), calNow.get(Calendar.DAY_OF_MONTH));
        layout.addView(date1);

        TextView text2 = new TextView(this);
        text2.setText("集計終了日");
        text2.setTextColor(Color.LTGRAY);
        layout.addView(text2);

        final DatePicker date2 = new DatePicker(MainActivity.this);
        date2.setCalendarViewShown(false);
        layout.addView(date2);

        // AlertDialogを構築する
        AlertDialog.Builder dlg = new AlertDialog.Builder(this);
        dlg.setTitle("処理期間の入力");
        dlg.setView(layout);

        dlg.setPositiveButton("決定", new DialogInterface.OnClickListener(){
            public void onClick(DialogInterface dialog, int which) {
                //Yesボタンが押された時の処理
                Log.d("date1 (start)", "year=" + String.valueOf(date1.getYear()) +
                        ", month=" + String.valueOf(date1.getMonth() + 1) + ", day=" + String.valueOf(date1.getDayOfMonth()));
                Log.d("date2 (end)", "year=" + String.valueOf(date2.getYear()) +
                        ", month=" + String.valueOf(date2.getMonth() + 1) + ", day=" + String.valueOf(date2.getDayOfMonth()));
            }});
        dlg.setNegativeButton("キャンセル", new DialogInterface.OnClickListener(){
            public void onClick(DialogInterface dialog, int which) {
                //Noボタンが押された時の処理
            }});
        // AlertDialogを表示する
        dlg.show();
    }