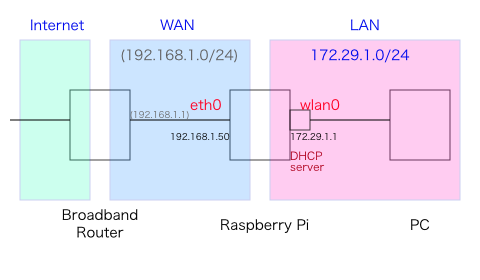
Raspberry PiにUSB Wifi LANインターフェースを取り付け、Wifi アクセスポイント + ルータとして利用するための方法。
イーサネットとWifiを逆にしたルータについては、以前の記事『Raspberry Piでルータを構築』に掲載している。
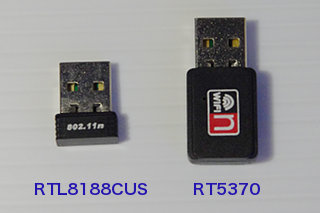
今回、Ralink Technology RT5370を使ったUSB Wifiアダプタを用いている。以前、RTL8188CUSを使ったUSB WifiアダプタでドライバがWifi APに対応していなかったため、今回新たにUSB Wifiアダプタを入手して試してみた。

■ ネットワーク設定
Debianの公式マニュアル『NetworkConfiguration』を参考にしつつ設定する。
auto lo
iface lo inet loopback

# WAN : Ethernet
auto eth0
iface eth0 inet static
  address 192.168.1.50
  netmask 255.255.255.0
  network 192.168.1.0
  gateway 192.168.1.1
  broadcast 192.168.1.255

  post-up route add default gw 192.168.1.1 dev eth0

# LAN : Wifi
auto wlan0
iface wlan0 inet static
  address 172.29.1.1
  netmask 255.255.255.0
  network 172.29.1.0
  gateway 172.29.1.1
  broadcast 172.29.1.255

  post-up route del default dev wlan0
auto wlan0をallow-hotplug wlan0と書くと、route設定がおかしくなる場合がある。緑の文字色にしたインターフェース認識後に実行されるスクリプトは、route設定がおかしくなった場合の次善措置(無くても、多分動く)。
念の為、サーバ起動後にrouteでdefault gwが192.168.1.1であることを確認すること。
DNS参照は次のようにGoogle DNSサーバを最初に指定しておく。
nameserver 8.8.8.8
nameserver 8.8.4.4
nameserver 192.168.1.1
※または、/etc/network/interfacesに次のように設定しても良い。
dns-nameservers 8.8.8.8 8.8.4.4 192.168.1.1
■ LAN側DHCPサーバの設定
dhcpサーバをインストールする
$ sudo apt-get install isc-dhcp-server
dhcpサーバの設定
〜 略 〜

# option definitions common to all supported networks...
option domain-name "example.org";
option domain-name-servers ns1.example.org, ns2.example.org;

default-lease-time 600;
max-lease-time 7200;

# If this DHCP server is the official DHCP server for the local
# network, the authoritative directive should be uncommented.
authoritative;

# Use this to send dhcp log messages to a different log file (you also
# have to hack syslog.conf to complete the redirection).
log-facility local7;

〜 略 〜

subnet 172.29.1.0 netmask 255.255.255.0 {
 range 172.29.1.100 172.29.1.150;
 option broadcast-address 172.29.1.255;
 option routers 172.29.1.1;
 default-lease-time 600;
 max-lease-time 7200;
 option domain-name "raspberrypi";
 option domain-name-servers 8.8.8.8, 8.8.4.4, 192.168.1.1;
}
■ パケット転送の設定
〜 略 〜

# Uncomment the next line to enable TCP/IP SYN cookies
# See http://lwn.net/Articles/277146/
# Note: This may impact IPv6 TCP sessions too
#net.ipv4.tcp_syncookies=1

# Uncomment the next line to enable packet forwarding for IPv4
net.ipv4.ip_forward=1

# Uncomment the next line to enable packet forwarding for IPv6
#  Enabling this option disables Stateless Address Autoconfiguration
#  based on Router Advertisements for this host
#net.ipv6.conf.all.forwarding=1

〜 略 〜
■ iptablesの設定
ルールの初期化と、IPマスカレードの設定。設定値をファイルに書き出す。
$ sudo iptables -t nat -F
$ sudo iptables -t filter -F
$ sudo iptables -t nat -A POSTROUTING -o eth0 -j MASQUERADE
$ sudo iptables-save > /etc/iptables
起動時にiptables設定を読み込むようにする
#!/bin/sh
iptables-restore < /etc/iptables
ファイル属性の変更
$ sudo chown root:root /etc/network/if-pre-up.d/iptables
$ sudo chmod 755 /etc/network/if-pre-up.d/iptables
■ Wifi アクセスポイントの設定
hostrapdデーモンを導入する
$ sudo apt-get install hostapd
設定ファイルを編集する
interface=wlan0
driver=nl80211
ssid=RaspberryPi
hw_mode=g
channel=11
beacon_int=100
max_num_sta=5
macaddr_acl=0
auth_algs=1
wpa=2
wpa_passphrase=Pass0123
wpa_key_mgmt=WPA-PSK
rsn_pairwise=CCMP
この状態でRaspberry Piを再起動するとルータとして機能する。
