スクリプトプログラムを手軽に編集するためのエディタ Geany を使ってみた。
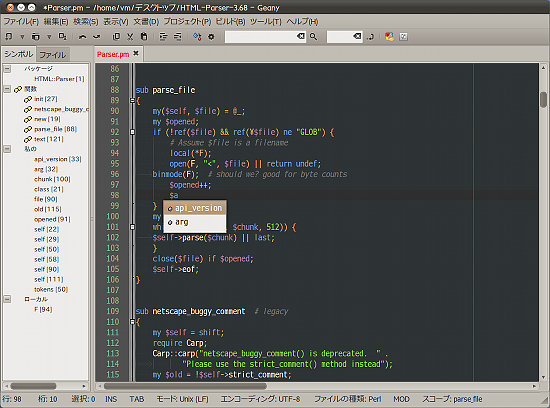
Geany の画面
UbuntuのGnomeデスクトップに標準でインストールされている gedit と比べて
・シンボルブラウザ(関数、変数などの一覧)がある
・標準でシンボル補完 (Ctrl + Space キー)
・構文の折りたたみができる
というあたりが売りなのだろうか。表示色のカスタマイズもできるが、リソースファイルを直接編集しなければならないあたりが、やはりLinuxだなぁと…
デフォルトは「白くて眩しい」ので、Geanyの公式サイトより
Download»Extras で配布されている 『Geany Dark Tango Scheme』をインストールする。
なぜか、Perl用のリソースが含まれていないので、似たような配色で作成したのが、つぎのもの
元ファイルは /usr/share/geany からユーザの設定ディレクトリにコピーして、それを編集する。
$HOME/.config/geany/filedefs/filetypes.perl
[styling]
# foreground;background;bold;italic
error=0xFF786D;0x2e3436;false;false
preprocessor=0x007f7f;0x2e3436;false;false
scalar=0xad7fa8;0x2e3436;false;false
pod=0xad7fa8;0x2e3436;false;false
array=0xD4A791;0x2e3436;false;false
hash=0xD4A791;0x2e3436;false;false
symboltable=0xD4A791;0x2e3436;false;false
pod_verbatim=0xD4A791;0x2e3436;false;false
reg_subst=0xD4A791;0x2e3436;false;false
here_delim=0xD4A791;0x2e3436;false;false
variable_indexer=0xD4A791;0x2e3436;false;false
default=0xc1c1c1;0x2e3436;false;false
commentline=0x747474;0x2e3436;false;true
number=0x8ae234;0x2e3436;false;false
string=0x8ae234;0x2e3436;false;false
character=0x8ae234;0x2e3436;false;false
word=0x729fcf;0x2e3436;false;false
global=0xeeeeec;0x2e3436;false;false
symbol=0xeeeeec;0x2e3436;false;false
classname=0xeeeeec;0x2e3436;false;false
defname=0xeeeeec;0x2e3436;false;false
operator=0xfcaf3e;0x2e3436;false;false
identifier=0xeeeeec;0x2e3436;false;false
modulename=0xc1c1c1;0x2e3436;false;false
backticks=0x30FF00;0x2e3436;false;false
instancevar=0xBB6D22;0x2e3436;false;true
classvar=0xc1c1c1;0x2e3436;false;false
datasection=0xFFB19D;0x2e3436;false;false
heredelim=0xFFB19D;0x2e3436;false;false
worddemoted=0xc1c1c1;0x2e3436;false;false
stdin=0xFF6383;0x2e3436;false;false
stdout=0xFF6383;0x2e3436;false;false
stderr=0xFF6383;0x2e3436;false;false
datasection=0xD4A791;0x2e3436;false;false
regex=0xD4A791;0x2e3436;false;false
here_q=0xc1c1c1;0x2e3436;false;false
here_qq=0xc1c1c1;0x2e3436;false;false
here_qx=0xc1c1c1;0x2e3436;false;false
string_q=0x8ae234;0x2e3436;false;false
string_qq=0x8ae234;0x2e3436;false;false
string_qx=0x8ae234;0x2e3436;false;false
string_qr=0x8ae234;0x2e3436;false;false
string_qw=0x8ae234;0x2e3436;false;false
upper_bound=0xeeeeec;0x2e3436;false;false
行番号表示のあたりも、眩しくて仕方ないので変更してみる
$HOME/.config/geany/filedefs/filetypes.common
[styling]
default=default
selection=0xe0e0e0;0x505050;false;true
brace_good=0xc1c1c1;0x6CA846;true;false
brace_bad=0xc1c1c1;0xFF8484;true;false
margin_linenumber=0x7CB991;0x505050;false;false
margin_folding=0x000000;0x101010;false;false
current_line=0x0;0x2F2F2F;true;false
indent_guide=0x5C5C5C;0x2e3436;false;false
white_space=0x424242;0x2e3436;true;true
[named_styles]
default=0xc1c1c1;0x2e3436;false;false
最後に、Perlがコンパイルエラーとなるので、「ビルド」メニュー → 「インクルードと引数の設定」で、コンパイルコマンドを perl -c "%f" とシンプルに仕上げておく。