新しい仮想マシンイメージ(AMI)の作成は、ローカル環境(手元のパソコン)またはEC2の仮想マシン内のどちらでも行うことが出来る。今回は、作成したAMIをAmazon S3にアップロードする時の転送速度が速く、課金対象とならない『EC2の仮想マシン内で』行った。
■ EC2内でのAMI作成環境の起動
AmazonがリリースしたFedora 8の次に示すイメージを使う。
『 ec2-public-images/fedora-8-i386-base-v1.10.manifest.xml 』
■ Amazon Web Services アクセス用鍵ファイルの作成とダウンロード
過去の記事 『 Amazon EC2:稼動中のOSイメージをS3にバックアップする 』 のとおり行い、アクセス用の秘密鍵と証明書を得る。
ローカル環境に鍵ファイルを得た場合は、SCP(Linuxの場合)やWinSCP(Windowsの場合)などを用いて、EC2の仮想マシンに転送しておく。
鍵ファイルの転送先は、/root/.ssh/ ディレクトリとした。
■ Amazon EC2 API Toolsのダウンロードとセットアップ
Javaランタイム ライブラリをインストールする。
過去の記事 『 (Linux) Fedora 8 に Sun の Javaをインストール 』 の通り行う。
ローカル環境(手元のパソコン)にAmazon EC2 API Toolsをインストールする。
公式ガイド Amazon Elastic Compute Cloud Getting Started Guide の、『 Getting Started with the Command Line Tools 』 に、ソフトウエアのダウンロード先や、セットアップ方法が書かれている。 かいつまんで書くと…
Developer Tools : Amazon EC2 API Tools から ec2-api-tools.zip をダウンロードする。
圧縮ファイルを適当なフォルダに解凍する。
[root@domU ~]$ cd /usr/lib
[root@domU lib]$ unzip ec2-api-tools.zip
[root@domU lib]$ rm ec2-api-tools.zip
[root@domU lib]$ mv ec2-api-tools-1.3-42584/ ec2_tool
環境変数の設定
Linuxの場合、次のように環境変数を設定する。このようなスクリプトを作成しておくと便利。
export EC2_HOME=/usr/lib/ec2_tool
export EC2_PRIVATE_KEY=$EC2_HOME/key/pk-BXCXZX5XLMCN4VL7CX5SDXSXQX3XRX2U.pem
export EC2_CERT=$EC2_HOME/key/cert-BXCXZX5XLMCN4VL7CX5SDXSXQX3XRX2U.pem
export JAVA_HOME=/usr/java/jre1.6.0_12
export PATH=$PATH:$EC2_HOME/bin
実行する場合は、次のように source コマンドを用いて実行する。
[root@domU ~]$ source /usr/lib/ec2_tool/envset.sh
■ Amazon EC2 AMI Toolsのインストール
ローカルマシンにJDKとrubyが必要となるので、あらかじめインストールしておく。
[root@domU ~]# yum install ruby
Amazon EC2 AMI Toolsをダウンロードし、インストールする。
[root@domU ~]# wget http://s3.amazonaws.com/ec2-downloads/ec2-ami-tools.noarch.rpm
[root@domU ~]# rpm -ivh ec2-ami-tools.noarch.rpm
警告: ec2-ami-tools.noarch.rpm: ヘッダ V3 RSA/SHA1 signature: NOKEY, key ID c375432d
準備中... ########################################### [100%]
1:ec2-ami-tools ########################################### [100%]
■ 仮想ディスクファイルを作成し、フォーマットする
ここから先は、公式ガイド Amazon Elastic Compute Cloud Developer Guide の、『 Using Amazon EC2 -> Creating and Preparing AMIs -> Creating an AMI 』 に詳細に説明されている。
今回は4ギガバイトのディスク容量を確保する。(Amazon EC2の/dev/sda1の割り当てサイズが10ギガバイトのため、最大でも10ギガバイトしか許容されないはず)
[root@domU ~]# mkdir ./centos53
[root@domU ~]# cd ./centos53
[root@domU centos53]# dd if=/dev/zero of=centos.img bs=1M count=4096
[root@domU centos53]# mke2fs -F -j ./centos.img
■ OSをインストールする下準備
作成した仮想ディスクをマウントし、公式ガイドに示された下準備を行う。
[root@domU centos53]# mkdir /mnt/ec2-fs
[root@domU centos53]# mount -o loop ./centos.img /mnt/ec2-fs
[root@domU centos53]# mkdir /mnt/ec2-fs/proc
[root@domU centos53]# mount -t proc none /mnt/ec2-fs/proc
fstabファイルを作成する。
[root@domU centos53]# mkdir /mnt/ec2-fs/etc
[root@domU centos53]# vi /mnt/ec2-fs/etc/fstab
/dev/sda1 / ext3 defaults 1 1
none /dev/pts devpts gid=5,mode=620 0 0
none /dev/shm tmpfs defaults 0 0
none /proc proc defaults 0 0
none /sys sysfs defaults 0 0
または、実行中の仮想マシン(Fedora8)のものをコピーして編集するのが手っ取り早い。
[root@domU centos53]# cp /etc/fstab /mnt/ec2-fs/etc/
デバイスファイルを作る
[root@domU centos53]# mkdir /mnt/ec2-fs/etc
[root@domU centos53]# /sbin/MAKEDEV -d /mnt/ec2-fs/dev -x console
[root@domU centos53]# /sbin/MAKEDEV -d /mnt/ec2-fs/dev -x null
[root@domU centos53]# /sbin/MAKEDEV -d /mnt/ec2-fs/dev -x zero
仮想ディスクにCentOSをインストールするための、yumの設定ファイルを作成する
[root@domU centos53]# vi ./yum-xen.conf
[main]
cachedir=/var/cache/yum
debuglevel=2
logfile=/var/log/yum.log
exclude=*-debuginfo
gpgcheck=0
obsoletes=1
reposdir=/dev/null
[base]
name=CentOS 5.3 - Base
mirrorlist=http://mirrorlist.centos.org/?release=5.3&arch=i386&repo=os
enabled=1
[updates-released]
name=CentOS 5.3 - Released Updates
mirrorlist=http://mirrorlist.centos.org/?release=5.3&arch=i386&repo=updates
■ CentOSのインストール
Coreグループと、Baseグループをインストールします。Baseグループも不必要という場合は、それを省いても、必要な個々のパッケージをインストールしていけば問題ないんじゃないでしょうか。
[root@domU centos53]# yum -c ./yum-xen.conf --installroot=/mnt/ec2-fs -y groupinstall Core
〜yumのインストール画面がひたすら流れ去ります〜
[root@domU centos53]# yum -c ./yum-xen.conf --installroot=/mnt/ec2-fs -y groupinstall Base
〜yumのインストール画面がひたすら流れ去ります〜
■ さらに仮想ディスク内の設定ファイルを編集していく
ネットワークインターフェースの設定。これも実行中の仮想マシン(Fedora8)のものを丸ごとコピーするほうが手っ取り早い。編集作成する場合は次の通り。
[root@domU centos53]# vi /mnt/ec2-fs/etc/sysconfig/network-scripts/ifcfg-eth0
DEVICE=eth0
BOOTPROTO=dhcp
ONBOOT=yes
TYPE=Ethernet
USERCTL=yes
PEERDNS=yes
IPV6INIT=no
[root@domU centos53]# vi /mnt/ec2-fs/etc/sysconfig/network
NETWORKING=yes
/etc/fstab に、マウント設定を追加する。これも実行中の仮想マシン(Fedora8)のものをコピーするのが手っ取り早い。編集作成する場合は次の通り。
[root@domU centos53]# vi /mnt/ec2-fs/etc/fstab
/dev/sda1 / ext3 defaults 1 1
/dev/sda2 /mnt ext3 defaults 0 0
/dev/sda3 swap swap defaults 0 0
none /dev/pts devpts gid=5,mode=620 0 0
none /dev/shm tmpfs defaults 0 0
none /proc proc defaults 0 0
none /sys sysfs defaults 0 0
SELinuxを利用しないなら、次のように無効化しておく。(enabledとなっているのを、disabledに変更)
SELINUX=disabled
不必要そうなサービスを、ここで無効化しておく。稼動中の仮想マシン(Fedora8)での初期設定を参考に必要・不必要を仕分けすることもできる。
[root@domU centos53]# chroot /mnt/ec2-fs /bin/sh
sh-3.2# chkconfig --list
NetworkManager 0:off 1:off 2:off 3:off 4:off 5:off 6:off
〜サービスの一覧が表示される〜
yum-updatesd 0:off 1:off 2:on 3:on 4:on 5:on 6:off
sh-3.2# chkconfig acpid off
sh-3.2# chkconfig apmd off
sh-3.2# chkconfig autofs off
sh-3.2# chkconfig avahi-daemon off
sh-3.2# chkconfig bluetooth off
sh-3.2# chkconfig cpuspeed off
sh-3.2# chkconfig cups off
sh-3.2# chkconfig gpm off
sh-3.2# chkconfig hidd off
sh-3.2# chkconfig irqbalance off
sh-3.2# chkconfig lvm2-monitor off
sh-3.2# chkconfig mcstrans off
sh-3.2# chkconfig mdmonitor off
sh-3.2# chkconfig netfs off
sh-3.2# chkconfig nfslock off
sh-3.2# chkconfig pcscd off
sh-3.2# chkconfig portmap off
sh-3.2# chkconfig readahead_early off
sh-3.2# chkconfig readahead_later off
sh-3.2# chkconfig restorecond off
sh-3.2# chkconfig rpcidmapd off
sh-3.2# chkconfig rpcgssd off
sh-3.2# chkconfig smartd off
sh-3.2# chkconfig yum-updatesd off
sh-3.2# chkconfig iptables off ← SSHがはじかれる懸念があるため
sh-3.2# chkconfig ip6tables off ← SSHがはじかれる懸念があるため
sh-3.2# exit
iptablesは仮想マシン起動後に、iptablesルールを適切に設定して、サービスを再有効化すること!
■ SSH接続用鍵の受渡し自動化スクリプトを作成
公式ガイドに掲載されていないが、公式サポート掲示板でこのスクリプトが実行されていないと、SSH用の鍵の受渡しがされないとなっている。
これも実行中の仮想マシン(Fedora8)からコピーするのが手っ取り早く安全。編集入力する場合は、次のように行う。
[root@domU centos53]# vi /mnt/ec2-fs/usr/local/sbin/get-credentials.sh
#!/bin/bash
# Retreive the credentials from relevant sources.
# Fetch any credentials presented at launch time and add them to
# root's public keys
PUB_KEY_URI=http://169.254.169.254/1.0/meta-data/public-keys/0/openssh-key
PUB_KEY_FROM_HTTP=/tmp/openssh_id.pub
PUB_KEY_FROM_EPHEMERAL=/mnt/openssh_id.pub
ROOT_AUTHORIZED_KEYS=/root/.ssh/authorized_keys
# We need somewhere to put the keys.
if [ ! -d /root/.ssh ] ; then
mkdir -p /root/.ssh
chmod 700 /root/.ssh
fi
# Fetch credentials...
# First try http
curl --retry 3 --retry-delay 0 --silent --fail -o $PUB_KEY_FROM_HTTP $PUB_KEY_URI
if [ $? -eq 0 -a -e $PUB_KEY_FROM_HTTP ] ; then
if ! grep -q -f $PUB_KEY_FROM_HTTP $ROOT_AUTHORIZED_KEYS
then
cat $PUB_KEY_FROM_HTTP >> $ROOT_AUTHORIZED_KEYS
echo "New key added to authrozied keys file from parameters"|logger -t "ec2"
fi
chmod 600 $ROOT_AUTHORIZED_KEYS
rm -f $PUB_KEY_FROM_HTTP
elif [ -e $PUB_KEY_FROM_EPHEMERAL ] ; then
# Try back to ephemeral store if http failed.
# NOTE: This usage is deprecated and will be removed in the future
if ! grep -q -f $PUB_KEY_FROM_EPHEMERAL $ROOT_AUTHORIZED_KEYS
then
cat $PUB_KEY_FROM_EPHEMERAL >> $ROOT_AUTHORIZED_KEYS
echo "New key added to authrozied keys file from ephemeral store"|logger -t "ec2"
fi
chmod 600 $ROOT_AUTHORIZED_KEYS
chmod 600 $PUB_KEY_FROM_EPHEMERAL
fi
if [ -e /mnt/openssh_id.pub ] ; then
if ! grep -q -f /mnt/openssh_id.pub /root/.ssh/authorized_keys
then
cat /mnt/openssh_id.pub >> /root/.ssh/authorized_keys
echo "New key added to authrozied keys file from ephemeral store"|logger -t "ec2"
fi
chmod 600 /root/.ssh/authorized_keys
fi
[root@domU centos53]# chmod +x /mnt/ec2-fs/usr/local/sbin/get-credentials.sh
[root@domU centos53]# vi /mnt/ec2-fs/etc/rc.d/rc.local
#!/bin/sh
#
# This script will be executed *after* all the other init scripts.
# You can put your own initialization stuff in here if you don't
# want to do the full Sys V style init stuff.
touch /var/lock/subsys/local
# Get your chosen keypair credentials
/usr/local/sbin/get-credentials.sh
■ SSHDの設定ファイルを書き換える
標準のままでは、rootのアクセスや、鍵ファイルによる認証が行われない(可能性がある)。書き換え後のファイルの要点は次のようになる。これも、実行中の仮想マシン(Fedora8)を参考にしながら行うが、ファイルを丸ごとコピーしないこと。
#LoginGraceTime 2m
PermitRootLogin without-password
StrictModes yes
#MaxAuthTries 6
RSAAuthentication yes
PubkeyAuthentication yes
AuthorizedKeysFile .ssh/authorized_keys
# For this to work you will also need host keys in /etc/ssh/ssh_known_hosts
RhostsRSAAuthentication no
# similar for protocol version 2
HostbasedAuthentication no
# To disable tunneled clear text passwords, change to no here!
PasswordAuthentication no
PermitEmptyPasswords no
#PasswordAuthentication yes
# Change to no to disable s/key passwords
#ChallengeResponseAuthentication yes
ChallengeResponseAuthentication no
X11Forwarding yes
#X11DisplayOffset 10
#X11UseLocalhost yes
#PrintMotd yes
#PrintLastLog yes
TCPKeepAlive yes
#UseLogin no
UsePrivilegeSeparation yes
#PermitUserEnvironment no
#Compression delayed
#ClientAliveInterval 0
#ClientAliveCountMax 3
ShowPatchLevel no
UseDNS no
# override default of no subsystems
Subsystem sftp /usr/libexec/openssh/sftp-server
AllowUsers root
■ 仮想ディスクをアンマウント
仮想ディスク内の設定ファイルの編集はここまでで終了したので、仮想ディスクをアンマウントする。
[root@domU centos53]# umount /mnt/ec2-fs/proc
[root@domU centos53]# umount /mnt/ec2-fs
■ ディスクイメージをEC2用イメージに変換
公式ガイド Amazon Elastic Compute Cloud Getting Started Guide の、Getting Started with the Command Line Tools -> Running an Instance -> Linux and UNIX -> Bundling an AMI の通りに行う。
[root@domU centos53]# ec2-bundle-image -i ./centos.img --privatekey /mnt/pk-BXCXZX5XLMCN4VL7CX5SDXSXQX3XRX2U.pem --cert /mnt/cert-BXCXZX5XLMCN4VL7CX5SDXSXQX3XRX2U.pem --user 1234-5678-3210 -r i386 -d /mnt/centos53 -p centos53
■ イメージファイルを Amazon S3にアップロードする
過去の記事 『 Amazon EC2:稼動中のOSイメージをS3にバックアップする 』 に既に書いたとおりの方法で行う。
[root@domU centos53]# ec2-upload-bundle --bucket amicentos53 --manifest /mnt/centos53.manifest.xml --access-key 0123X456X789X321X2 --secret-key sywHyjesGTWxwuUKSYjcguwkbswkSSWk
■ Amazon S3のイメージファイル(AMI)をEC2に登録する
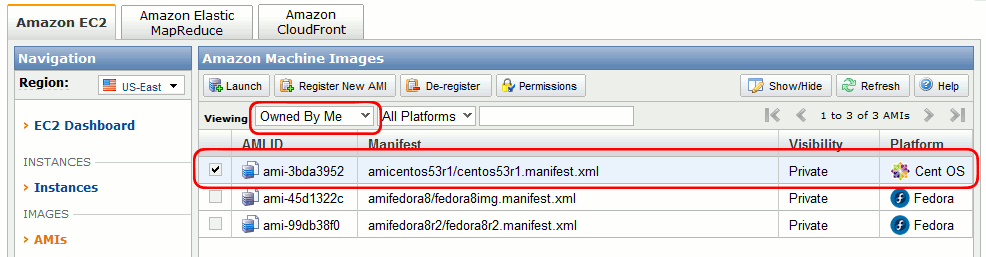
[root@domU centos53]# ec2-register amicentos53/centos53.manifest.xml
登録後、手元のマシンのブラウザでAWS Management Consoleを表示すると、次のように登録されているはず。
■ Amazonのクラウド サービスに関する他の記事
・Amazon EC2:稼動中のOSイメージをS3にバックアップする
・Amazon EC2を使ってWikipediaをEPWINGデータに変換
・Amazon EC2:1分で構築するWebサーバ
・LinuxサーバからAmazon S3を用いる (2/2)
・(Perl) LinuxサーバからAmazon S3を用いる (1/2)
■ 参考にしたホームページ
・公式ガイド Amazon Elastic Compute Cloud Getting Started Guide
・公式ガイド Amazon Elastic Compute Cloud Developer Guide
・Amazon EC2用Centos5イメージを作って、EC2上で動作させてみる
・Amazon EC2 用に自分で CentOS 5 のイメージを用意する